Drop shadow in Photoshop effect can improve a photo’s visual experience simply by adding shadow to it. The realistic Drop shadow in Photoshop is the most popular of all shadow effect providers. The realistic Drop shadow in Photoshop effect gives an image a more genuine, professional, and reliable appearance.
Product photography with a drop shadow in photoshop can be found on Amazon, eBay, and other famous e-commerce websites. Adobe Photoshop is used to add a drop shadow to an item. The shadow appears to be genuine, and the product looks to be rising. It gives the image a more realistic look.

Using a drop shadow with e-commerce goods improves the visual attractiveness of the product photos. Every E-commerce business owner, manager, and product photographer wishes to attract more customers through product photography. Adding a drop shadow in Photoshop might help you seize the moment.
What is drop shadow in photoshop?
Drop shadow in Photoshop is a picture editing effect that a Photoshop expert utilizes to enhance the realism and beauty of images. These photos can be used to create product catalogs, advertisements, and websites. Typically, there are two types of shadow effects in Photoshop: cast a shadow and produce a shadow.
When a subject’s shadow is cast on the surface of a photograph, this is referred to as Photoshop cast shadow. Form shadow, on the other hand, is the shadow observed within the item itself. The main considerations when adding shadow to a photograph are the direction, distance, and the number of light sources available.
Why is the photoshop drop shadow effect important?
The drop shadow in Photoshop effect greatly alters and improves the quality of images. Moreover, the effect can give a photograph a unique and spectacular appearance. As a result, the drop shadow effect in Photoshop is crucial for photographs that need to impress their audience.
Product photographers and merchants, as well as fashion and magazine companies, provide the most beautiful and trustworthy photographs. As a result, the realistic drop shadow InDesign effect is a must-have for them.
How to Add Drop Shadow In Photoshop?
Knowing how to apply a shadow in Photoshop is not required, but because the effect is noticeable, there is no harm in learning how to do so. So, without further ado, let’s get this party started.
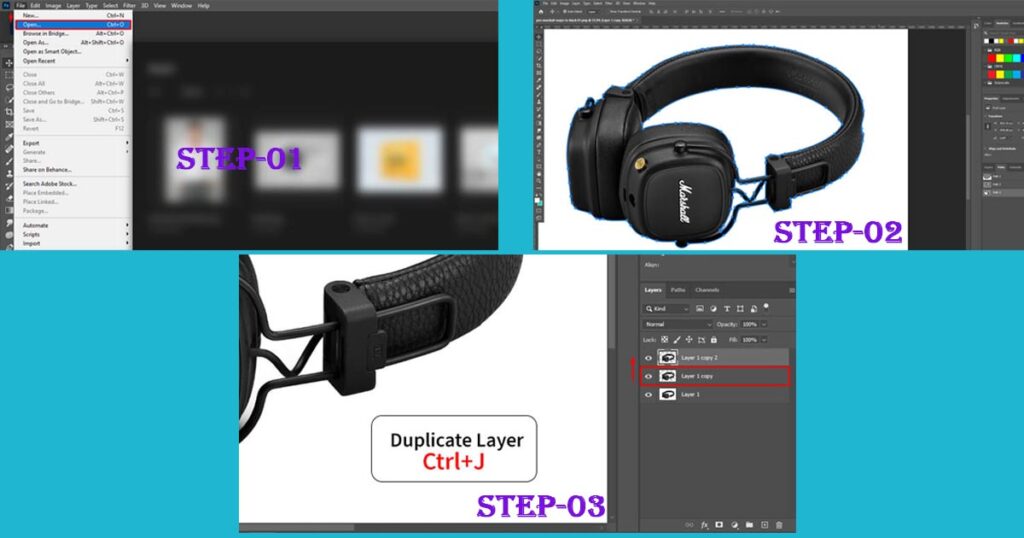
Step 1: Launch Photoshop and open the image.
For this tutorial, you can use any subject-focused image, or you can use a product image, as we did.
First and first!
In Photoshop, open the image you’ve chosen. You can drag and drop the image onto Photoshop’s artboard, or you can go to File, then Open to choose the image, and then press the Insert button.
Step 2: Remove background from an image.
I could have skipped this step, but I wanted to maintain this article as a one-stop-shop for individuals interested in learning how to make realistic drop shadows in Photoshop. Before we can create the drop shadow, we must first remove the backdrop from the image.

You can isolate the topic from its background by selecting it with any selection tool and then erasing it using the background eraser. However, I would recommend that you use the clipping path technique with the Photoshop pen tool for the selection procedure in order to achieve an exact and professional result.
Step 3: Make a Duplicate Layer.
After removing the background from the image, we must now create a duplicate layer in order to keep the original layer intact. To duplicate a layer in Photoshop, select the original layer and press Ctrl+J, which is a duplicate layer photoshop shortcut. In the layer panel, a replica layer will appear beneath the original one. Click and drag on the newly generated layer to the top, which will now serve as our foreground.
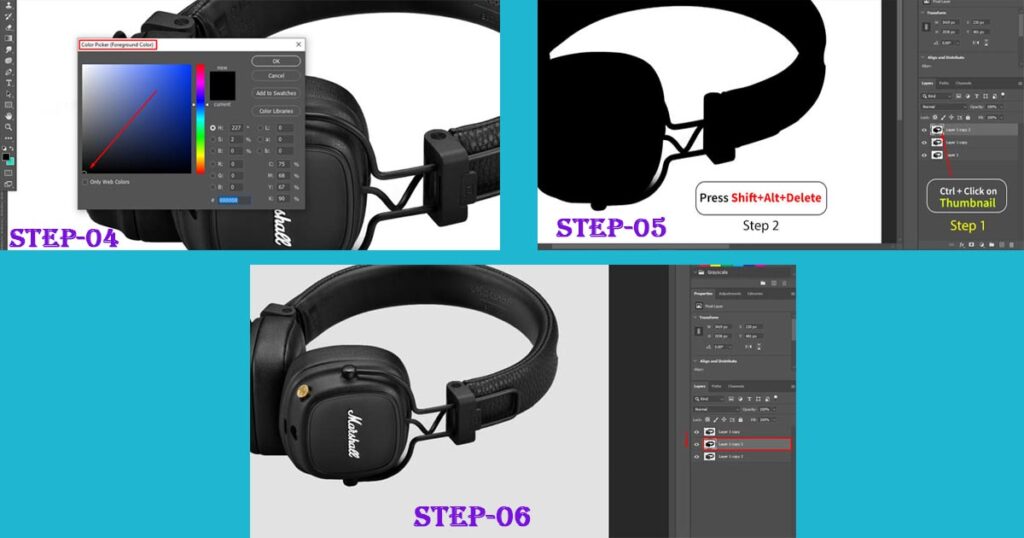
Step 4: Change the background color
We’ll now make our background color black. You can edit it manually or with the Photoshop keyboard shortcut (Ctrl+X). First, from the toolbar, pick Set Foreground Color and then the black color from the color panel.
Step 5: Create The Duplicate Layer black.
In this step, we’ll make our duplicate layer black. To accomplish so, we’ll first select our layer by clicking on it, then hit Shift + Alt + Delete. Our duplicate layer image will become black, which we will employ in our Photoshop drop shadow effect.

Step 6: Make a Shadow
Using the dark section we created in the previous stage, we will now build our realistic drop shadow. To make shadows, use the free transform tool while keeping the duplicate layer selected and using Ctrl+t to bring up the transform tool.
You can use the tool to move the black section wherever you wish. But since we’re here to make a drop shadow, drop shadows in photoshop often sit beneath the topic. As a result, we will enlarge the dark portion and place it beneath our subject.
To produce the Drop shadow in Photoshop, click and hold on the top middle portion of the transform tool and drag it down. Now, click on the duplicate layer and drag it beneath the original layer to create a drop shadow effect.
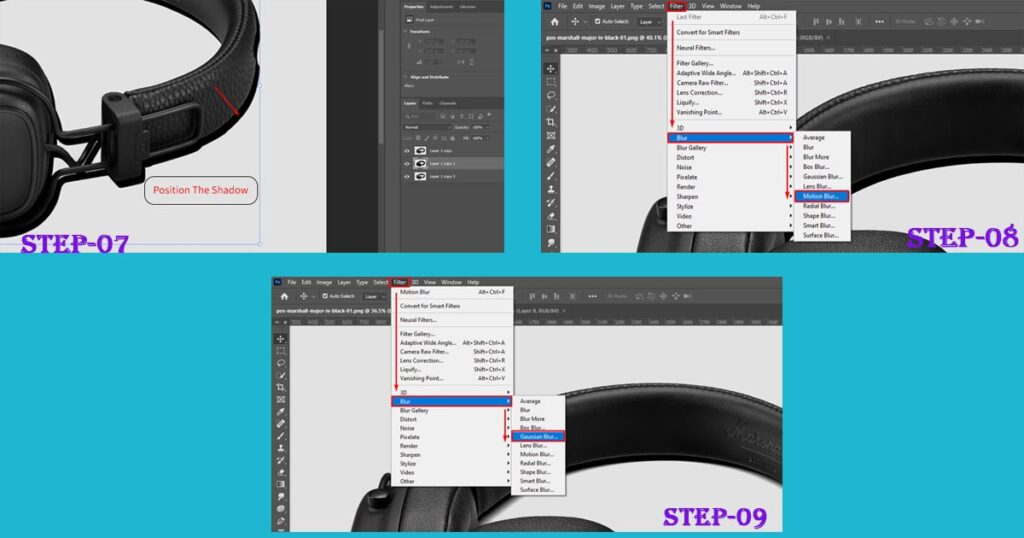
Step 7: Align the Shadow
Positioning the Photoshop drop shadow effect is critical; otherwise, it will not act as a drop shadow. Use the transform tool to fine-tune the position, and when you’re satisfied, press the “Enter” or “Return” key to exit the “Free Transform Tool.”
Step 8: Apply Motion Blur.
Use the motion blur effect on the shadow to soften it and blur the edges. Select Motion Blur from the Filter>Blur menu. There will be a popup window. The angle and distance can then be adjusted to meet your needs. After you’ve made your changes, click OK to save them.

Step 9: Use Gaussian Blur
After we’ve used motion blur, we’ll apply gaussian blur to the scene. The Gaussian Blur photoshop filter may be found in the Filter Blur option at the top. After selecting, a window will appear, and we will need to modify the radius from there. I recommend that you use 3 px for the best shadow smoothening.
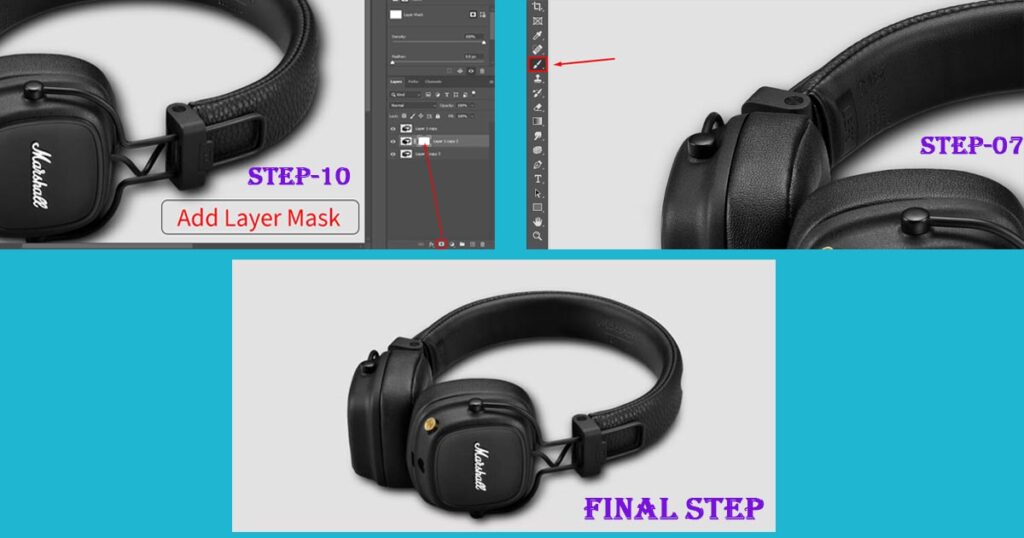
Step 10: Create a Layer Mask
Before we use the brush tool, we must first make a layer mask in the duplicate layer. We’ll add the layer mask by selecting the “Add Layer Mask” option from the “Layer Mask” button at the bottom of our layer panel.
Step 11: To achieve perfection, use the brush tool.
In this final phase, we’ll use the brush tool to perfect our shadow. To begin, go to the left toolbar and look for an icon with a brush on it. A drop-down menu will show when you click on the icon. Select the Brush Tool from the drop-down menu.
Before using the tool, set the opacity level to roughly 50-60 percent after choosing it. Change the background color to black and adjust the brush size to meet your needs.
Drag the brush tool over the shadow to smooth it out and make it look more natural. If you’ve gone too far, set the backdrop color to white and re-paint the area with the brush tool to get it back.
Work until you achieve the required quantity of drop shadow in photoshop by continuing this back-and-forth approach.

Step 11: Final Output
when you complete all processes, then save this and use it. It is not necessary to learn how to make realistic drop shadows in Photoshop, but it can provide you with some substantial benefits in the long run.
Why is Clipping Boss best for Drop Shadow in photoshop?
The Clipping Boss Company provides the best drop shadow in photoshop service for eCommerce Product Photo Editing & Retouching Services.
For photographers and eCommerce business owners, Clipping Boss is an excellent photo editing service provider. We believe in what we do: high-quality, expert work. As a result, following the decision, you may believe in our service and professionalism.
Images that are appealing to the eye for eCommerce products can help your firm create more sales and boost its return on investment. We provide the following services as the best eCommerce product photo editing and photo retouching services provider in the world:
Clipping Path
Ghost Mannequin
Photo Background Removal
Image Masking Technique
Image Retouch
Photo Color Correction
Dripping Noise and Grain Removal
Image Manipulation Technique


0 Comments