A clip masking is a collection of layers that have a mask applied to them. The bottommost layer, or base layer, defines the visible limits of the entire group. Imagine you have a shape in the lower layer, a photograph in the one above it, and text in the layer above that. If the photos and text are only visible through the form outline in the base layer, they inherit the base layer’s opacity.
What is Clip Masking?
Clip masking is a powerful approach to manage the visibility of a layer in Photoshop. Clip masking is comparable to layer masks in this regard. However, while the result may appear to be the same, clip masking and layer masks are not the same. A layer mask shows and hides distinct areas of a layer by using black and white.

A clip masking, on the other hand, controls the visibility of another layer by using the content and transparency of another layer.
We’ll need two layers to make a clip masking. The layer on the bottom influences the visibility of the layer above it.
The content on the layer above is visible where the bottom layer has actual content (pixels, shapes, or type). If any part of the bottom layer is transparent, the corresponding region on the layer above it is invisible. Although clipping masks appear to be more complicated than layer masks, they are just as simple to use. Let’s make our Clip masking to better understand how they work.
How A Clip Masking Works?
To fully comprehend Clip masking, we must first comprehend the distinction between content and transparency on a layer. You can open any image to follow along with me. I’ll use this photo of my little friend here, who is likewise trying to figure out what all this clipping business is about in her way.
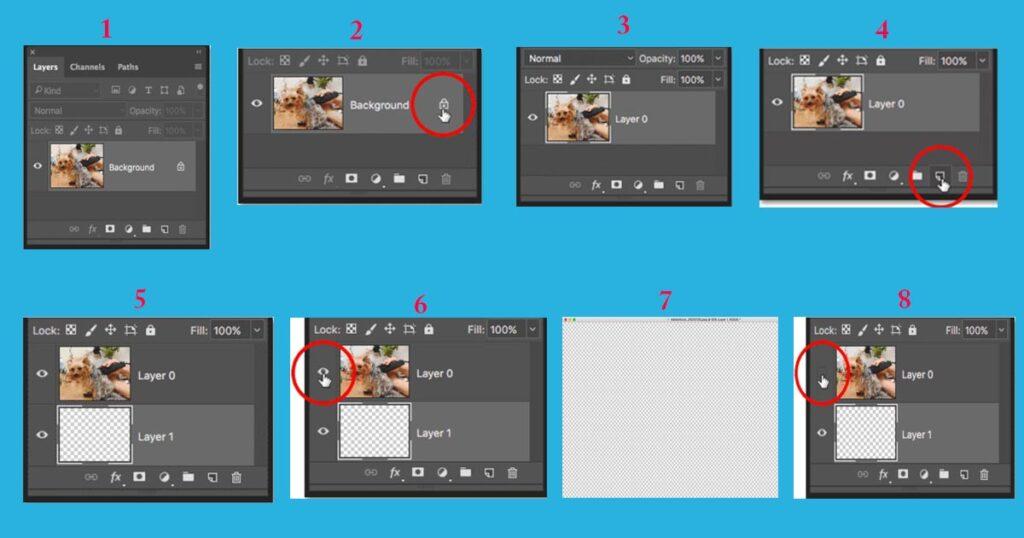
The photo is on the Background layer, which is currently the sole layer in the document, as shown in the Layers panel.
We’ll need two layers to construct a clipping mask: one to serve as the mask and one to be clipped to the mask, so let’s add an extra layer. Below the image, we’ll add the new layer.
Unlock the Background layer first. To unlock Photoshop CC, click the lock icon. Press and hold the Alt (Windows) / Option (Mac) key on your keyboard while double-clicking on the Background layer in Photoshop CS6 or earlier.
The Background layer is now unlocked and renamed “Layer 0.”
Then press and hold the Ctrl (Windows) / Command (Mac) key on your keyboard while clicking the Add New Layer button to add a new layer below the image.
Below the photo, a new layer named “Layer 1” appears, giving us two layers in the document. The lowest layer will be transformed into a mask, and the picture above it will be clipped to the mask.
For the time being, hide the original image by clicking the top layer’s visibility button.

We can see the layer we just added with the top layer turned off. New layers in Photoshop are blank by default, which means they have no content. We can look right through a layer with no content since it is transparent. When a transparent layer has no other layers underneath it, Photoshop displays the transparency as a checkerboard pattern, as shown above.
By clicking on the top layer’s visibility symbol again, you can reactivate it.
How to Use Clip Masking in Photoshop?
Step 1: Using the Baby girl digital paper set, make a backdrop.
Using the Shape Tool, create a heart.
Now place the image of the joyful girl within the heart!
Step 2: Create a second clipping mask to create a scrapbook look and experiment with layering clipping masks!
Using the Shape Tool, make another heart. Make it somewhat larger than the first and position it beneath the first heart.
Step 3: Cut out the heart shape pattern from the Baby girl digital paper set and place it within the huge heart.
Step 4: You may clip infinite layers into a single layer and alter their opacity and layer mode as usual; however, the opacity and layer mode of the base layer will influence all layers clipped into it.
I reduced the opacity of the smaller heart to 50% in the image below, which also reduced the opacity of the young girl image to 50%.
Step 5: Finally, you may clip layers into groups, but not groups into layers, and clipped layers cannot be grouped. You must group the clipped layers with the basic layer.
Let us increase our heart’s opacity to 100 percent.
All of your heart layers, save the backdrop, should be grouped, and the group should be called “Heart.”
Create a New Layer and clip it to the “Heart” group, with the layer’s visibility set to Screen.
Paint a gentle pink #facccf light all around the heart using a round brush. Take note of how the color stays contained inside the biggest heart’s bounds!
In Photoshop, we’ve learned how to create a mask. Believe it or not, clipping masks are one of Photoshop’s most powerful tools, with almost unlimited possibilities!

So, as usual, keep experimenting with different strategies, and don’t forget to share your results, along with any comments, comments, or criticisms, in the comments section below!
Why Outsource Image Clip Masking Service to us?
Clipping Boss is unique in that we not only provide premium photoshop masking but also bring together the ideal combination of high-quality specialists and industry-low masking rates. We use Photoshop picture masking to restore each pixel to its original form. Because it is a time-consuming operation, many experts become bored after a while, so we have roster base changing for photoshop specialists to keep them in a good mood while they work.
Our professionals use the appropriate techniques for those categories by utilizing their years of experience. we are constantly eager to employ the most cutting-edge photo editing techniques to successfully mask off items from their surroundings.
To construct the selection, we utilize the current version of Adobe Photoshop and the rapid selection and magic wand tools. Depending on the requirements, our experts utilize layer masking, alpha channel, transparent masking, and color masking on the photos.


0 Comments